"Wrapped, Jeweled and Embellished Creations" is the name of the article by Arline M. Lowenthal.
I start with cotton clothes line. I measure the length that I want the piece to be and add about 6 inches to that for the ends. It takes about 3 inches to make each loop on the ends.
I use Scotch tape to keep the ends from fraying. I wrap the end in tape about a quarter of an inch in...
I then form a loop to the size I want it. The size of the loop depends on the size of the button or bead that you will use to fit through the loop for the clasp.
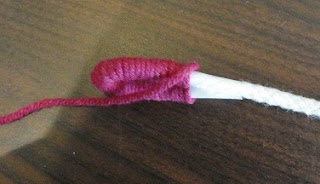
This is where I will start wrapping the fiber around the cord. We will wrap going from this point to the short end of the cord to make the loop. Start with a section of fiber about an inch long. It should be facing the short end of the cord.
Start wrapping the fiber around the cord over the one inch piece. This will hold the end of the fiber in place.
When I get to the tape on the end of the cord I make the loop by putting the end of the cord next to the cord.
It is hard to see the tape because it is clear but the end is taped to the cord to form the loop. I then wrap the fiber around both cord pieces and then keep wrapping down the cord.
To change to a different fiber I tie a slip knot around the cord at least two times with the fiber I am using. I then leave an inch of the fiber to wrap under with the next kind of fiber. I start it the same way as the first wrap was started with about an inch wrapped underneath. I ususally tie the end and then tack it with a needle and corresponding color of thread because you can't wrap the last end that you have.
I make both ends first and use a simple cotton yarn on the loops. I then add different fibers as I go.
To add another cord I lay them next to each other and tape and wrap the two together and continue down the new cord wrapping as I go.
I hope you enjoyed my first blog tutorial... but most of all I hope you are inspired to try your hand at wrapping and embellishing! It is nice because you can make a statement piece that is light weight and comfortable to wear. This tutorial is will get you started. The instructions in the magazine are a little different and certainly more involved but with trial and error it all works!
Please comment with questions and please share what you create with us on your blog!
Yours truly,
M


Oh - that looks like fun!!! I love working with fibers and just don't do it enough…
ReplyDeleteI know what I'm doing this weekend! THANK YOU, THANK YOU, THANK YOU!!!
ReplyDeleteThankyou for the tutorial, it was clear and easy to understand.I would like to give this a go soon.It's a great base for beads or looks great as a stand alone, too.
ReplyDeleteJenni
Oh, thank you so much for the instructions! I will also be heading out for some cotton line. Yeah!!!!
ReplyDeleteThis is AMAZING! Your tutorial is so clear and makes the technique look like so much fun ( I bet it is a bit more complicated than it looks, you're just a pro at it now, right? ;D ), I definitely want to try this sometime! Thanks for sharing it. :D
ReplyDeleteMarian, like you, I love coming across blogs that teach ... this was a wonderful "mini class" here, thank you for sharing, looks like so much fun.
ReplyDeleteThanks so much for writing and telling me about this post...Fantastic tutorial...So as soon as I make something I'll be sure to send you a message.
ReplyDeleteLOVE the way you did the loop ends!
ReplyDeleteHello ms. Marian,
ReplyDeleteThank you SO much for sharing your lovely tutorial! You made it very clear to me how it is done. Thanks again.
Lara
I have wondered how to finish a bracelet this way. Thanks!
ReplyDeleteMarian...su tecnica de enseñar es muy buena .poque hasta un niño pequeño puede seguirlo y realizar lo que usted esplico .felicitaciones.
ReplyDeleteThank you a lot! I was getting crazy about which handles to use.Awesome!
ReplyDeleteLove it !!!
ReplyDeleteWhat type of fiber do you use to rap the rope? Is it embroidery thread or yarn?
ReplyDeleteToni
You can use either. Sometimes I use both for the texture difference. Thanks for asking!
ReplyDeleteLove this can't wait to try it
ReplyDeleteGrazie cara! 😄
ReplyDeleteGratidão
ReplyDeleteI stumbled upon this article via Pinterest, and I am hitting my head wondering why I have never tried this for my jewelry. My jewelry is very rustic, and this may be the perfect neckpiece for some of the pieces. Thank you!
ReplyDeleteExcellent tutorial. I am definitely going to try it. Thank you!!
ReplyDelete