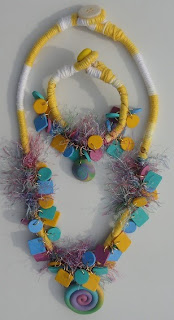
I have had lots of wonderful comments on the fiber wrapped cords that I use to make neckpieces. I call them "neckpieces" because they are usually more like a scarf than a necklace. I wanted to share how I make the wrapped cords with you. The inspiration to make these came from the Winter 2010 Belle Armoire Jewelry magazine.
"Wrapped, Jeweled and Embellished Creations" is the name of the article by Arline M. Lowenthal.
I start with cotton clothes line. I measure the length that I want the piece to be and add about 6 inches to that for the ends. It takes about 3 inches to make each loop on the ends.
I use Scotch tape to keep the ends from fraying. I wrap the end in tape about a quarter of an inch in...
Then I cut the end of the tape off to the end of the cord.
I then form a loop to the size I want it. The size of the loop depends on the size of the button or bead that you will use to fit through the loop for the clasp.
I then mark where the loop will meet the cord with my thumb.
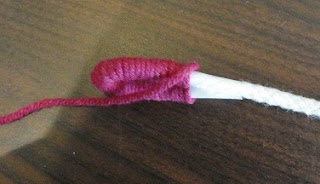
This is where I will start wrapping the fiber around the cord. We will wrap going from this point to the short end of the cord to make the loop. Start with a section of fiber about an inch long. It should be facing the short end of the cord.
Start wrapping the fiber around the cord over the one inch piece. This will hold the end of the fiber in place.
When I get to the tape on the end of the cord I make the loop by putting the end of the cord next to the cord.
I then tape the end to the cord. This is an important step because the loop can come apart if you don't... trust me on this one!
(As an added note it is best to stitch through the end of the cord and the main cord at this point... sometimes I don't even use the tape as the fibers may slip around it.)
It is hard to see the tape because it is clear but the end is taped to the cord to form the loop. I then wrap the fiber around both cord pieces and then keep wrapping down the cord.
To change to a different fiber I tie a slip knot around the cord at least two times with the fiber I am using. I then leave an inch of the fiber to wrap under with the next kind of fiber. I start it the same way as the first wrap was started with about an inch wrapped underneath. I ususally tie the end and then tack it with a needle and corresponding color of thread because you can't wrap the last end that you have.
I make both ends first and use a simple cotton yarn on the loops. I then add different fibers as I go.
To add another cord I lay them next to each other and tape and wrap the two together and continue down the new cord wrapping as I go.
I hope you enjoyed my first blog tutorial... but most of all I hope you are inspired to try your hand at wrapping and embellishing! It is nice because you can make a statement piece that is light weight and comfortable to wear. This tutorial is will get you started. The instructions in the magazine are a little different and certainly more involved but with trial and error it all works!
Please comment with questions and please share what you create with us on your blog!
Yours truly,
M


